Varnishのmoduleを作ってみよう(入門編)
こんにちは、Service Engineeringチームのいわなちゃんさん(@xcir)です。
このエントリはGREE Advent Calendar 2015とVarnish Cache Advent Calendar 2015の17日目の記事です。
はじめに
ApacheやNginxにmoduleがあるようにVarnishにもModule(Varnish Module / VMOD)という仕組みが存在します。
公式に多くのVMODがリストされており機能は多岐に渡ります。
少し紹介してみましょう。
libvmod-digest
hmac_sha256やhash_sha256などの様々なダイジェストを作成するモジュールです。
応用範囲が広くURLの改竄チェックや一定時間有効なURLなど様々なことが可能です。
libvmod-vslp
Varnishで標準で用意している振り分けアルゴリズム(これもDirectorsというVMODで実現されています)はコンシステントハッシュではありませんが、このVMODではサポートしています。
libvmod-redis
名前の通りVCL中からRedisに対してアクセスができます。
libvmod-awsrest
S3などにアクセスするために必要なシグネチャを作成します。
などなど、様々なVMODが存在します。
また、VMODは例えばlibvmod-digestのようにただダイジェストを作るだけのモジュールだとしてもVCLを組み合わせることでいろいろな機能を簡単に実現出来るのも特徴です。
他にもあまりネット上に記事がないため知られていませんが、コア部分を叩くことが無ければ割と簡単にVMODは作ることが可能です。
そこで今回は、実際にlibvmod-dump(以下vmod-dump)というVMODを作成しつつ解説します。
開発環境については以下の通りです。
- Ubuntu 14.04.3 LTS
- Varnish Cache 4.1.0
今回作るvmod-dumpについて
Varnishでデバッグする際はvarnishlogやvarnishncsaを利用してVSLに出力されたログを追っかけます。
例えばエラーが起きた際に再現させるためにrequestの詳細なデータを取得したいことがあります。
以前書いた記事に貼ってある生ログを参照していただきたいのですが、リクエストヘッダは含まれているけどボディが含まれていないことがわかります。
そこで今回のvmod-dumpではこれをdump出来るようにしようと思います。
|
1 2 3 4 5 6 7 |
import dump; sub vcl_deliver { if(resp.status >= 500) { dump.req("Error request."); } } |
イメージ的にはこのような感じで、VCLと組み合わせてステータスコードが500以上の時だけdumpするようにしたいと思います。
最初に環境を準備する
3.0.xのころはVMODの開発環境を作るのは割とめんどくさかったのですが最新の4.1.xでは非常に簡単です。
まずは環境を整えつつビルドして動くところまで確認してみましょう。
パッケージのインストール
VMOD作成で最低限必要なパッケージは以下なのでとりあえず入れましょう。
- varnish
- libvarnishapi1
- libvarnishapi-dev
他にもautotools(automake autoconf libtool)やpython-docutilsなどが必要ですが開発を行うマシンであれば大体入っていると思いますので割愛します。
入ってなくても以降の手順中にモジュールが足りないというエラーが出るのでそのタイミングでインストールすれば良いです。
テンプレートの取得(vmod-example)
Varnish公式でVMODを作成するためのテンプレートを用意しています。
まずはこちらをcloneします。
|
1 2 3 4 5 6 7 8 |
xcir@varnish41-1:~/ex$ git clone https://github.com/varnish/libvmod-example.git libvmod-dump Cloning into 'libvmod-dump'... remote: Counting objects: 615, done. remote: Total 615 (delta 0), reused 0 (delta 0), pack-reused 615 Receiving objects: 100% (615/615), 90.33 KiB | 0 bytes/s, done. Resolving deltas: 100% (320/320), done. Checking connectivity... done. xcir@varnish41-1:~/ex$ |
テンプレートをリネーム(rename-vmod-script)
まだcloneしてきただけで、中身はvmod-exampleなので、リネームします。
リネームするためのrename-vmod-scriptというスクリプトが同梱されているのでそれを利用すると一気に変更できて便利です。
|
1 2 3 4 5 6 7 8 9 10 |
xcir@varnish41-1:~/ex/libvmod-dump$ ./rename-vmod-script Usage: ./rename-vmod-script Rename libvmod-example source tree. xcir@varnish41-1:~/ex/libvmod-dump$ ./rename-vmod-script dump rm 'rename-vmod-script' All done. For your cut&paste needs: git commit -a -m "Automatic rename of libvmod-example to libvmod-dump." xcir@varnish41-1:~/ex/libvmod-dump$ |
ビルドしてインストールしてみる
とりあえずこの状態のままでビルドしてインストールしてみましょう。
|
1 2 3 4 5 6 7 8 9 10 11 12 13 14 15 16 17 18 19 20 21 |
xcir@varnish41-1:~/ex/libvmod-dump$ ./autogen.sh + aclocal -I m4 -I /usr/share/aclocal ... src/Makefile.am: installing './depcomp' + autoconf xcir@varnish41-1:~/ex/libvmod-dump$ ./configure checking build system type... x86_64-unknown-linux-gnu ... config.status: executing depfiles commands config.status: executing libtool commands xcir@varnish41-1:~/ex/libvmod-dump$ make make all-recursive make[1]: Entering directory `/home/xcir/ex/libvmod-dump' ... make[1]: Leaving directory `/home/xcir/ex/libvmod-dump' xcir@varnish41-1:~/ex/libvmod-dump$ sudo make install Making install in src make[1]: Entering directory `/home/xcir/ex/libvmod-dump/src' ... make[1]: Leaving directory `/home/xcir/ex/libvmod-dump' xcir@varnish41-1:~/ex/libvmod-dump$ |
エラーが出る場合はだいたいパッケージ不足だと思いますので、エラーの内容にそってパッケージを入れてください。
よくrst2manがないというエラーがでる場合がありますが、python-docutilsを入れれば解決します。
Varnishから動作の確認をしてみる
今ビルドしたvmod_dump(中身はexampleですが)を実際にVarnishから叩いてみましょう。
まずは、使い方を見てみます。
|
1 2 3 4 5 6 7 8 9 10 11 12 13 14 15 16 17 18 19 20 21 22 23 24 25 26 27 28 29 30 31 32 33 |
xcir@varnish41-1:~/ex/libvmod-dump$ man vmod_dump VMOD_DUMP(3) VMOD_DUMP(3) NAME vmod_dump - Example VMOD SYNOPSIS import dump [from "path"] ; DESCRIPTION This is the embedded documentation for the dump VMOD. It should mention what the vmod is intended to do. It can span multiple lines and is written in RST format. You can even have links and lists in here: o https://github.com/varnish/libvmod-dump/ o https://www.varnish-cache.org/ The init-function declared next does not have documentation. CONTENTS o STRING hello(STRING) STRING hello(STRING) Prototype STRING hello(STRING) The different functions provided by the VMOD should also have their own embedded documentation. This section is for the hello() function. COPYRIGHT Copyright YOU (c) 1900. (vmodtool requires this format.) |
helloファンクションがあるので使ってみます。
|
1 2 3 4 5 6 7 8 |
vcl 4.0; import std; import dump; ... sub vcl_recv { std.log(dump.hello("world")); } |
|
1 2 |
root@varnish41-1:/home/xcir# varnishlog -ivcl_log -graw 5 VCL_Log c Hello, world |
動作の確認ができました。
次は実際にコードを書いていきましょう。
コードを書いていく
ディレクトリ構造を見てみよう
VMODを作る上で最低限変更する必要があるファイルが幾つかあります。
まずはディレクトリ構造を見てみましょう。
|
1 2 3 4 5 6 7 8 9 10 11 12 13 14 15 16 17 18 19 20 21 22 23 |
|-- COPYING |-- LICENSE |-- Makefile.am |-- README.rst |-- autogen.sh |-- configure.ac |-- debian | |-- changelog | |-- compat | |-- control | |-- copyright | |-- dirs | |-- docs | `-- rules |-- m4 | `-- PLACEHOLDER |-- src | |-- Makefile.am | |-- tests | | `-- test01.vtc | |-- vmod_dump.c | `-- vmod_dump.vcc `-- vmod-dump.spec |
この中で最低限変更する必要があるのが
- vmod_dump.vcc
- vmod_dump.c
です。
vmod_dump.cはそのままソースコードです。
vccとcを見てみよう
とりあえずvmod_dump.vccを見てみましょう。
|
1 2 3 4 5 6 7 8 9 10 11 12 13 14 15 16 17 18 19 20 21 22 23 24 25 26 27 |
# # Copyright YOU (c) 1900. # # (vmodtool requires this format.) # $Module dump 3 Example VMOD DESCRIPTION =========== This is the embedded documentation for the dump VMOD. It should mention what the vmod is intended to do. It can span multiple lines and is written in RST format. You can even have links and lists in here: * https://github.com/varnish/libvmod-dump/ * https://www.varnish-cache.org/ The init-function declared next does not have documentation. $Event init_function $Function STRING hello(STRING) The different functions provided by the VMOD should also have their own embedded documentation. This section is for the hello() function. |
このファイルにはVCLから呼び出すための定義や先ほどmanを作成します。(先述)
Prefixに「$」がついているものが実際にコードに影響するもので、それ以外はコメントやmanで使われる部分になります。
では$だけを抜き出すと
|
1 2 3 |
$Module dump 3 Example VMOD $Event init_function $Function STRING hello(STRING) |
になります。
それぞれ説明します。
$Module [module名 ] [セクション番号 ] [簡単な説明(optional) ]
モジュール名になります。
VCLからimportを行う際はここの名前が使用されます。
$Event [ Eventを処理するFunction ]
例えば読み込まれたとか破棄されたとかVMODのライフサイクルにはいくつかのイベントがあります。
| イベント名 | 説明 |
|---|---|
| VCL_EVENT_LOAD | VCLが読込された。何かしらの初期化処理をしたい時などに利用 |
| VCL_EVENT_DISCARD | VCLが破棄された。不要なリソースの開放などを行う |
| VCL_EVENT_WARM | VCLがWarm状態になった。なんらかのバックグラウンドの処理を行う場合はVCL_EVENT_COLDと合わせて意識する必要がある。 |
| VCL_EVENT_COLD | VCLがCold状態になった。 |
| VCL_EVENT_USE | VCLが使用開始された(廃止予定) |
ファンクションを呼ばれたタイミングですぐ返せるものであればあまりこの辺を意識する必要がありませんが、
例えばバックグラウンドで定期的に外部から情報を取得してきてそれで動きを変えるVMODの場合であればWARM/COLDを意識する必要があるでしょう。
ちなみにWARM/COLDは4.1から追加された機能です。(参考)
|
1 2 3 4 5 6 7 8 9 10 |
int init_function(const struct vrt_ctx *ctx, struct vmod_priv *priv, enum vcl_event_e e) { if (e != VCL_EVENT_LOAD) return (0); /* init what you need */ return (0); } |
見て分かるように変数eにイベントの種類が入っているのでそれで処理する形になります。
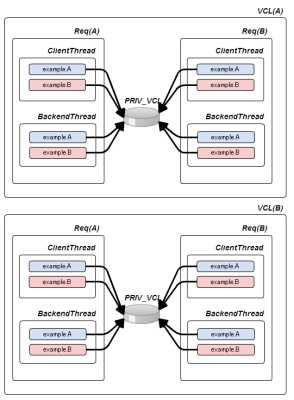
privは後でも出てきますが、他のFunctionでも利用できるグローバル変数(PRIV_VCL)みたいなものです。
ちなみにこの$Event定義自体が省略可能です。
$Function [ 戻り値の型 ] [ Function名 ]([ 引数(optional) ],...)
Functionの定義です。
$Function STRING hello(STRING)
に対応するファンクションは以下になります。
|
1 2 3 4 5 6 7 8 9 10 11 12 13 14 15 16 17 18 19 |
VCL_STRING vmod_hello(VRT_CTX, VCL_STRING name) { char *p; unsigned u, v; u = WS_Reserve(ctx->ws, 0); /* Reserve some work space */ p = ctx->ws->f; /* Front of workspace area */ v = snprintf(p, u, "Hello, %s", name); v++; if (v > u) { /* No space, reset and leave */ WS_Release(ctx->ws, 0); return (NULL); } /* Update work space with what we've used */ WS_Release(ctx->ws, v); return (p); } |
vccで定義したファンクション名のprefixにvmod_が付く形になります。
また型ですが以下の種類があります。
| vccでの型 | コード中での型 | オリジナルの定義 | 説明 |
|---|---|---|---|
| BACKEND | VCL_BACKEND | const struct director * | バックエンド定義 |
| BLOB | VCL_BLOB | const struct vmod_priv * | VMOD間でデータのやり取りをするときに使用 |
| BOOL | VCL_BOOL | unsigned | BOOL |
| BYTES | VCL_BYTES | double | ファイルサイズを指定、VCL中では単位でB,KB,MB,GB,TBが指定可能 |
| DURATION | VCL_DURATION | double | 時間を指定、VCL中では単位でms,s,m,h,d,w,yが指定可能 |
| ENUM | VCL_ENUM | const char * | 列挙型、定義ではENUM { foo, bar }のように指定する |
| HEADER | VCL_HEADER | const struct gethdr_s * | ヘッダー、req.http.cookieのように指定する |
| HTTP | VCL_HTTP | struct http * | HTTPヘッダ全体を表す、reqのように指定 |
| INT | VCL_INT | long | 整数 |
| IP | VCL_IP | const struct suckaddr * | IPアドレス |
| PRIV_CALL | struct vmod_priv * | ← | 呼び出し毎に有効なプライベートポインタ、同一Functionでも異なる呼び出しではポインタは共有されません、この型はVCL中から指定できません。 |
| PRIV_VCL | struct vmod_priv * | ← | VCL中で有効なプライベートポインタ、この型はVCL中から指定できません。 |
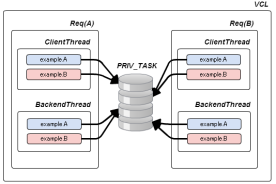
| PRIV_TASK | struct vmod_priv * | ← | タスク毎(client/backend)に有効なプライベートポインタ、この型はVCL中から指定できません。 |
| PRIV_TOP | struct vmod_priv * | ← | リクエスト(ESIのサブリクエストを含む)全体で有効なプライベートポインタ、このポインタはclient側でのみ有効です、この型はVCL中から指定できません。 |
| REAL | VCL_REAL | double | 浮動小数点 |
| STRING | VCL_STRING | const char * | 文字列型 |
| STRING_LIST | const char *, ... | ← | 文字列型(リスト) |
| TIME | VCL_TIME | double | 時刻 |
| PROBE | VCL_PROBE | const struct vrt_backend_probe * | ヘルスチェックの定義(probe) |
| VOID | VCL_VOID | void | VOID |
今回は入門編ということもあるので全ての細かい使い方は説明しませんが
PRIV_は使い方が特殊なのとスコープが割と難しいので図解します。
PRIV_はvccで以下のように書いても
|
1 |
$Function VOID example(PRIV_TOP) |
VCLから呼び出す場合は
|
1 |
example.example(); |
となり、指定できません。VMODでのみ使用が可能です。
PRIV_VCL

VCL毎に保持するプライベートのポインタ(以下priv)です。
同一VMODのFunctionなどから同じポインタが使用できます。
Eventで渡されるprivはこれです。
また、VCL毎なので例えばVCLをreloadするなどした場合は当然ながら別のprivになります。
例えば、そのVMOD全体で使う正規表現のコンパイルした結果のストアなどに使用します。
PRIV_CALL

呼び出し毎に保持するprivです。
リクエストを重ねても同じ呼び出しでは同じprivが返されます。
ただし、同じファンクションでも呼び出し位置が違う場合は別privになります。
例えば、その呼び出し毎にコストがかかる初期化が必要な場合に使用します。
PRIV_TASK

vxid毎に保持するprivです。
リクエスト毎に作成され、リクエスト間では共有されません。
例えば、クッキーやPOSTのパース結果などに使用します。
PRIV_TOP

req_top.*変数と同じスコープで保持するprivです。
親子関係を含むリクエスト毎で作成され、関連しないリクエストでは共有されません。
また、backendthread(vcl_backend_responseなど)では利用できません。
例えば、親子間でデータのやり取りする場合に使用します。
ファンクションの定義はこれらを組み合わせて行います。
また、変わった使い方としてですがデフォルト値を指定可能です。
|
1 |
$Function foo(STRING a="hoge", INT b=0) |
のような指定をすることでVCLから引数を省略したり一部の指定が可能です。
|
1 2 |
//bのみ指定する example.foo(b=123); |
その他
$Objectと$Methodというものがあります。
これはvmod-directorsのようにオブジェクトを作成して動くものに使用されます。
今回は詳しく解説しません。
vmod-dumpのコードを書く
今回リクエストのボディを取得するには、以前記事で紹介した方法(VRB)を使います。
問題はそれをどうやって出力するかです。
例えば直接ファイルに出力することも可能ですが、パフォーマンスの観点からオススメできません。
VMODはVCLから呼び出されますが、VCLに存在するvcl_recvなどの各アクションの中にはレスポンスが終わった後に実施するものがありません。
つまりそこにファイル操作を行ってしまうとその分パフォーマンスが悪化します。
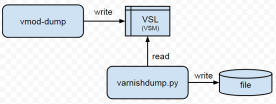
そこで今回はVSLに出力した上で別のコマンドでデータを取得するようにします。

このようなイメージでつくっていきます。
まず、vccを変更します。
(なお、以下のコードはvmod-dumpの開発途中のコードのためバグがあったりします、最新版はこちらを参照ください。)
|
1 2 3 4 5 6 7 8 9 10 11 12 13 14 15 16 17 18 19 20 21 22 23 24 25 26 27 |
# # Copyright YOU (c) 1900. # # (vmodtool requires this format.) # $Module dump 3 Example VMOD DESCRIPTION =========== This is the embedded documentation for the dump VMOD. It should mention what the vmod is intended to do. It can span multiple lines and is written in RST format. You can even have links and lists in here: * https://github.com/varnish/libvmod-dump/ * https://www.varnish-cache.org/ The init-function declared next does not have documentation. $Event init_function $Function VOID req(STRING val="") The different functions provided by the VMOD should also have their own embedded documentation. This section is for the hello() function. |
そしてコードです。
|
1 2 3 4 5 6 7 8 9 10 11 12 13 14 15 16 17 18 19 20 21 22 23 24 25 26 27 28 29 30 31 32 33 34 35 36 37 38 39 40 41 42 43 44 45 46 47 48 49 50 51 52 53 54 55 56 57 58 59 60 61 62 63 64 65 66 67 68 69 70 71 72 73 74 75 76 77 78 79 80 81 82 83 84 85 86 87 88 89 90 91 92 93 94 95 96 97 98 99 100 101 102 103 |
#include <stdio.h> #include <stdlib.h> #include "vcl.h" #include "vrt.h" #include "cache/cache.h" #include "vcc_if.h" #define VMOD_DUMP_KEY "VMOD-DUMP: " #define VMOD_DUMP_KEY_LEN 11 int init_function(const struct vrt_ctx *ctx, struct vmod_priv *priv, enum vcl_event_e e) { if (e != VCL_EVENT_LOAD) return (0); /* init what you need */ return (0); } void dump_VSL_split(struct req *req, char *p, unsigned mlen, const void *ptr, size_t l, unsigned br){ char *p2 = p + VMOD_DUMP_KEY_LEN; unsigned mlen2 = mlen - VMOD_DUMP_KEY_LEN; size_t length = l; void *c_ptr = (void*)ptr; txt t; t.b = p; do{ if(mlen2 > length){ memcpy(p2, c_ptr, length); t.e = t.b + length + VMOD_DUMP_KEY_LEN; if(br) { memcpy(p2 + length, "\r\n", 2); t.e += 2; } VSLbt(req->vsl, SLT_Debug,t); break; } memcpy(p2, c_ptr, mlen2); t.e = t.b + mlen2 + VMOD_DUMP_KEY_LEN; if(br) { memcpy(p2 + mlen2, "\r\n", 2); t.e += 2; } VSLbt(req->vsl, SLT_Debug,t); c_ptr += mlen2; length -= mlen2; }while(1); } static int __match_proto__(req_body_iter_f) vbf_printRequestBody(struct req *req, void *priv, void *ptr, size_t l) { CHECK_OBJ_NOTNULL(req, REQ_MAGIC); unsigned mlen; unsigned u; char *p; //get vsl max size per line. mlen = cache_param->vsl_reclen - 3; //reserve work-space u = WS_Reserve(req->ws, 0); if(u < mlen) { //no space. WS_Release(req->ws, 0); return (0); } p = req->ws->f; //add prefix strcpy(p, VMOD_DUMP_KEY); //val dump_VSL_split(req, p, mlen, priv, strlen(priv), 0); //request header for(int i=0; i < req->http0->nhd; ++i) { if (req->http0->hd[i].b == NULL && req->http0->hd[i].e == NULL) continue; dump_VSL_split(req, p, mlen, req->http0->hd[i].b, (req->http0->hd[i].e - req->http0->hd[i].b), 1); } dump_VSL_split(req,p,mlen,"\r\n",2,0); //request body if (l > 0){ dump_VSL_split(req, p, mlen, ptr, l, 0); } //free work-space WS_Release(req->ws, 0); return (0); } VCL_VOID vmod_req(VRT_CTX, VCL_STRING val) { VRB_Iterate(ctx->req, vbf_printRequestBody, (void*)val); } |
基本的には以前の記事と同等なのですが、幾つかの要素を加えてますので解説します。
VRT_CTX(ctx)
vrt_ctxにはリクエスト・レスポンスヘッダの内容やVCL、workspaceなどの情報が入っています。
Varnishの各種情報にアクセスしたい場合はここを辿ると基本的にすべてあります。
今回リクエストヘッダを取得する際にctx->req->http0を利用していますが、このhttp0はVCLで変更した内容が含まれないオリジナルのヘッダになります。
また、必ずしも構造体にあるデータが全て有効というわけではありません。
わかり易い例だとbackend-threadではctx->reqにはアクセスできません、実際に叩いてみるのが分かりやすいです。
cache_param->vsl_reclen
VSLのラインあたりに出力可能なサイズは決まっており、それを超過すると切り捨てられるため、最大長(vsl_reclen)をパラメータから取得する必要があります。
cache_paramには起動時に指定する各種パラメータが格納されているのでそこからvsl_reclenを取得します。
WS_Reserve, WS_Release(ワークスペース)
Varnish では、セッション毎にワークスペース(crx->ws)を持っています。ここからメモリを確保すれば、Varnish 側で制御してくれるのでメモリリークの心配がなく便利です。
使い方はそこまで難しくありません。
基本的にはWS_Reserveで一時領域を確保してWS_Releaseで固定化もしくは開放します。
vmod-exampleのコードとwsの定義を見てみましょう。
|
1 2 3 4 5 6 7 8 9 10 11 12 13 14 15 16 17 18 19 20 21 22 23 24 |
VCL_STRING vmod_hello(VRT_CTX, VCL_STRING name) { char *p; unsigned u, v; u = WS_Reserve(ctx->ws, 0); /* Reserve some work space */ //[確保出来たサイズ] = WS_Reserve(ctx->ws, [確保したいサイズ、基本的には限界まで取得する0を指定する]); p = ctx->ws->f; /* Front of workspace area */ //ctx->ws->fが使用可能なポインタを示しているのでそれを指定 v = snprintf(p, u, "Hello, %s", name); v++; //サイズチェック if (v > u) { /* No space, reset and leave */ WS_Release(ctx->ws, 0); //WS_Release(ctx->ws, [0を指定すると確保した領域を破棄する]); return (NULL); } /* Update work space with what we've used */ WS_Release(ctx->ws, v); //WS_Release(ctx->ws, [固定化したいサイズを指定]); return (p); } |
|
1 2 3 4 5 6 7 8 9 10 11 12 13 14 |
/*-------------------------------------------------------------------- * Workspace structure for quick memory allocation. */ struct ws { unsigned magic; #define WS_MAGIC 0x35fac554 char id[4]; /* identity */ char *s; /* (S)tart of buffer */ char *f; /* (F)ree/front pointer */ char *r; /* (R)eserved length */ char *e; /* (E)nd of buffer */ }; } |
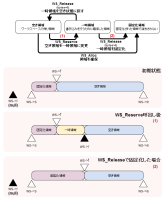
WS_Reserve/WS_Release(おまけでWS_Allocも)を利用した際にどのようにワークスペースの状態が変わるかと構造体内のs,f,r,eポインタの動きを図解します。

一時領域は、使い終わった時点で必ずその領域を返却するかか固定化する必要があります。一時領域を作れるのは一つまでのため、どちらもせずに再度使用開始しようとするとエラーとなります。
また、WS_Reserveで確保したからといって、確保した領域がzero-fillされてはいません。実際にメモリを確保するのではなくポインタを動かしているだけだからです。
ちなみに、今回利用したのは文字列処理を行うための一時領域としてです。なので固定は行っていません。
VSLbt
VSLにデータを書き込む関数です。
他にもVSLbやVSLb_twなどがあります。
また、VSLに書き込む際に通常のVCL_LogタグではなくDebugタグ(SLT_Debug)を利用しています。
これはリクエストボディにはバイナリが含まれる可能性があるため、テキストのみしか許容しないVCL_Logが使えず、許容しているDebugタグを使用したためです。
動作を確認してみる
ビルドして動作をチェックしてみましょう。
|
1 2 3 4 5 6 7 8 9 10 11 12 13 14 15 16 17 |
vcl 4.0; import std; import dump; backend default { .host = "127.0.0.1"; .port = "8080"; } sub vcl_recv { std.cache_req_body(1MB); } sub vcl_deliver{ if(resp.status >= 500){ dump.req("hogehoge"); } } |
backendのサーバは立ち上げなくて大丈夫です。
上がっていなければ503が出るからです。
|
1 2 3 4 5 6 7 8 9 10 11 12 13 14 15 |
xcir@varnish41-1:~/ex/libvmod-dump$ curl -F 'file=@README.rst' http://localhost:6081/ <!DOCTYPE html> <html> <head> <title>503 Backend fetch failed</title> </head> <body> <h1>Error 503 Backend fetch failed</h1> <p>Backend fetch failed</p> <h3>Guru Meditation:</h3> <p>XID: 6</p> <hr> <p>Varnish cache server</p> </body> </html> |
|
1 2 3 4 5 6 7 8 9 10 11 12 13 14 15 16 17 18 19 20 21 22 23 24 25 26 27 28 29 30 |
root@varnish41-1:/home/xcir/ex/libvmod-dump# varnishlog -qdebug:VMOD-DUMP -graw 5 Debug c "VMOD-DUMP: hogehoge" 5 Debug c "VMOD-DUMP: POST%0d%0a" 5 Debug c "VMOD-DUMP: /%0d%0a" 5 Debug c "VMOD-DUMP: HTTP/1.1%0d%0a" 5 Debug c "VMOD-DUMP: User-Agent: curl/7.35.0%0d%0a" 5 Debug c "VMOD-DUMP: Host: localhost:6081%0d%0a" 5 Debug c "VMOD-DUMP: Accept: */*%0d%0a" 5 Debug c "VMOD-DUMP: Content-Length: 4897%0d%0a" 5 Debug c "VMOD-DUMP: Content-Type: multipart/form-data; boundary=------------------------936f45dd837943cd%0d%0a" 5 Debug c "VMOD-DUMP: %0d%0a" 5 Debug c "VMOD-DUMP: --------------------------936f45dd837943cd%0d%0aContent-Disposition: form-data; name="file"; filename="README.rst"%0d%0aContent-Type: application/octet-stream%0d%0a%0d%0a============%0avmod_dump%0a============%0a%0a------------------------------------%0aDump the reques" 5 Debug c "VMOD-DUMP: -----------------------------------%0a%0a:Author: Shohei Tanaka(@xcir)%0a:Date: 2015-12-11%0a:Version: develop-varnish41%0a:Support Varnish Version: 4.1.x%0a:Manual section: 3%0a%0aSYNOPSIS%0a========%0a%0aimport dump;%0a%0aDESCRIPTION%0a===========%0a%0aExample Varnish vmod" 5 Debug c "VMOD-DUMP: o write an out-of-tree Varnish vmod.%0a%0aImplements the traditional Hello World as a vmod.%0a%0aFUNCTIONS%0a=========%0a%0areq%0a-----%0a%0aPrototype%0a ::%0a%0a req(STRING val)%0aReturn value%0a%09VOID%0aDescription%0a%09Write a request header-body to the V" 5 Debug c "VMOD-DUMP: ::%0a%0a import std;//use libvmod-std%0a import dump;%0a %0a sub vcl_recv {%0a std.cache_req_body(1MB);%0a }%0a sub vcl_deliver {%0a if(r" 5 Debug c "VMOD-DUMP: %0a dump.req("dump error request.");%0a }%0a }%0a %0a //Output sample.( curl -F 'file=@README.rst' http://localhost:6081/ )%0a //# varnishlog -graw -qdebug:VMO" 5 Debug c "VMOD-DUMP: // 32788 Debug c "VMOD-DUMP: dump error request."%0a // 32788 Debug c "VMOD-DUMP: POST%0d%0a"%0a // 32788 Debug c "VMOD-DUMP: /%0d%0a"%0a // 32788 Debug " 5 Debug c "VMOD-DUMP: TP/1.1%0d%0a"%0a // 32788 Debug c "VMOD-DUMP: User-Agent: curl/7.35.0%0d%0a"%0a // 32788 Debug c "VMOD-DUMP: Host: localhost:6081%0d%0a"%0a // 32788 Debug c "VMOD-DU" 5 Debug c "VMOD-DUMP: a"%0a // 32788 Debug c "VMOD-DUMP: Content-Length: 3200%0d%0a"%0a // 32788 Debug c "VMOD-DUMP: Content-Type: multipart/form-data; boundary=------------------------03d94756ba140cd1%0d%0a"%0a " 5 Debug c "VMOD-DUMP: 2788 Debug c "VMOD-DUMP: %0d%0a"%0a // 32788 Debug c "VMOD-DUMP: --------------------------03d94756ba140cd1%0d%0aContent-Disposition: form-data; name="file"; filename="README.rst"%0d%0aContent-Type: applicati" 5 Debug c "VMOD-DUMP: a%0d%0a============%0avmod_dump%0a============%0a%0a------------------------------------%0aDump the request h"%0a // 32788 Debug c "VMOD-DUMP: eader with body%0a------------------------------------%0a%0a:Author: Shohe" 5 Debug c "VMOD-DUMP: ate: 2015-12-11%0a:Version: develop-varnish41%0a:Support Varnish Version: 4.1.x%0a:Manual section: 3%0a%0aSYNOPSIS%0a========%0a%0aimport dump;%0a%0aDESCRIPTION%0a===========%0a%0aExampl"%0a //...%0a%0a %0a%0aINSTALLATION%0a=" 5 Debug c "VMOD-DUMP: rce tree is based on autotools to configure the building, and%0adoes also have the necessary bits in place to do functional unit tests%0ausing the ``varnishtest`` tool.%0a%0aBuilding requires the Varnish header files and uses pkg-config to find%0athe ne" 5 Debug c "VMOD-DUMP: e::%0a%0a ./autogen.sh%0a ./configure%0a%0aIf you have installed Varnish to a non-standard directory, call%0a``autogen.sh`` and ``configure`` with ``PKG_CONFIG_PATH`` pointing to%0athe appropriate path. For dump, when varnishd configure was called%0awith ``--" 5 Debug c "VMOD-DUMP: e%0a%0a PKG_CONFIG_PATH=${PREFIX}/lib/pkgconfig%0a export PKG_CONFIG_PATH%0a%0aMake targets:%0a%0a* make - builds the vmod.%0a* make install - installs your vmod.%0a* make check - runs the unit tests in ``src/tests/*.vtc``%0a* make distcheck - run check and prepa" 5 Debug c "VMOD-DUMP: vmod.%0a%0aInstallation directories%0a------------------------%0a%0aBy default, the vmod ``configure`` script installs the built vmod in%0athe same directory as Varnish, determined via ``pkg-config(1)``. The%0avmod installation directory can be overridden b" 5 Debug c "VMOD-DUMP: _DIR`` variable to ``configure``.%0a%0aOther files like man-pages and documentation are installed in the%0alocations determined by ``configure``, which inherits its default%0a``--prefix`` setting from Varnish.%0a%0aUSAGE EXAMPLE%0a=============%0a%0aIn your VCL" 5 Debug c "VMOD-DUMP: this vmod along the following lines::%0a%0a import dump;%0a%0a sub vcl_deliver {%0a # This sets resp.http.hello to "Hello, World"%0a set resp.http.hello = dump.hello("World");%0a }%0a%0aCOMMON PROBLEMS%0a========" 5 Debug c "VMOD-DUMP: : error: Need varnish.m4 -- see README.rst%0a%0a Check if ``PKG_CONFIG_PATH`` has been set correctly before calling%0a ``autogen.sh`` and ``configure``%0a%0a* Incompatibilities with different Varnish Cache versions%0a%0a Make sure you build this vmod aga" 5 Debug c "VMOD-DUMP: nt Varnish Cache version.%0a For dump, to build against Varnish Cache 4.0, this vmod must be built from branch 4.0.%0a%0d%0a--------------------------936f45dd837943cd--%0d%0a" |
無事出力できました。
VSLを読むコードを書く
以前の記事で触れたpython-varnishapiを使って作ります。
VSLに吐き出しているのでそれを取得して加工するだけなので割愛します。
コードはこちらにあります。
公開してみる
ここまででとりあえずVMODはできました。
他にテスト(vtc)を作成したり、ドキュメントなどを整備したりする必要がありますが
それが終わったら公式のVMODディレクトリに登録してみるのも良いでしょう。
ディレクトリのページの一番下にsignupの仕方と登録するためのリンクが有りますので、そこから登録しましょう。
VMODの登録は即時ではなく、簡単なレビューを行われて登録されるので数日まって特に問題なければリストに入ります。
vmod-dump自体について
この記事を書いた後も機能拡張をしてまして、レスポンスについてもdumpできるようになっています。(dump.resp)
また、同梱しているvarnishdump.pyを利用することでdumpファイルを取得することができます。
|
1 2 3 |
xcir@varnish41-1:~/ex/libvmod-dump/tools$ sudo ./varnishdump.py vxid:5 type:req time:20151216-111533 file:/home/xcir/ex/libvmod-dump/tools/log/20151216-111533_5_req.dump val:hogehoge 1stline:POST / HTTP/1.1 vxid:5 type:resp time:20151216-111533 file:/home/xcir/ex/libvmod-dump/tools/log/20151216-111533_5_resp.dump val:magemage 1stline:HTTP/1.1 503 Backend fetch failed |
ファイルの中身はまんまHTTPリクエストなのでもちろんそのままncコマンドを利用することで問題の再現が可能です。
|
1 2 3 4 |
xcir@varnish41-1:~/ex/libvmod-dump/tools/log$ cat 20151215-164657_32791_req.dump | nc localhost 6081 HTTP/1.1 503 Backend fetch failed Date: Tue, 15 Dec 2015 17:14:33 GMT ... |
レスポンスのdumpもあるのでdiffもとってみました。
|
1 2 3 4 5 6 7 8 9 10 11 12 13 14 15 16 17 |
xcir@varnish41-1:~/ex/libvmod-dump/tools$ cat /home/xcir/ex/libvmod-dump/tools/log/20151216-111533_5_req.dump | nc localhost 6081 | diff - /home/xcir/ex/libvmod-dump/tools/log/20151216-111533_5_resp.dump 2c2 < Date: Wed, 16 Dec 2015 02:22:56 GMT --- > Date: Wed, 16 Dec 2015 02:15:33 GMT 6c6 < X-Varnish: 32770 --- > X-Varnish: 5 9c9 < Content-Length: 282 --- > Content-Length: 278 21c21 < XID: 32771 --- > XID: 6 |
(Content-Lengthに違いが出てるのはXIDの桁数が変わった分です)
他にも一定時間経過したリクエストのみをdump出来るように、経過時間を取得するdump.elapsed()もあります。
|
1 2 3 4 5 6 7 8 9 10 11 12 13 14 |
vcl 4.0; import std; import dump; sub vcl_recv { std.cache_req_body(1MB); } sub vcl_deliver { if(dump.elapsed() > 3s){ //ここに到達するまで3秒かかったリクエストとレスポンスをdump dump.req("slow request."); dump.resp("slow request."); } } |
さらに4.1.0で新たにサポートされたPROXYプロトコルを利用する(-pオプション)ことでclient.ip/server.ipを当初のリクエストと同じ状態も再現することが可能です。
ACL込みで再現試験ができるので捗るような気がします。
よかったら使ってみてください。
最後に
今回はVMODの作成の仕方を紹介しました。
このように、テンプレートのおかげで結構簡単に作れることができます。
皆さんもチャレンジしてみてはいかがでしょうか?
明日の記事は、@hosi_mo(誕生日)さんです。お楽しみに!
ちなみに僕も今日が誕生日です!
リンク
libvmod-dump(今回作ったVMOD)
python-varnishapi(VSLを呼び出すのに使用したライブラリ)
公式のVMODに関するドキュメント
Varnish-Book
