SWFバイナリ編集のススメ第八回 (Action - AS2 Bytecode編)
こんにちは。プラットフォーム開発のよやです。
今回は SWF 3 から導入された DoAction タグと、それに含まれる ActionScript2(*1) Bytecode イメージの編集について、お話します。
似たタグに DoInitAction がありますが、形式的には Sprite ID のフィールド追加以外は同じですので説明を省きます。尚、DoInitAction は SWF 6 以降のタグです。
編集の目的
Flash Lite1.1 の SWF を携帯端末で表示する場合、URL や HTML タグでパラメータを渡せない制約があるので、ActionScript のロジックにパラメータを渡すのに色々と工夫のしがいがあります。
例えば、
- (a) DoAction 中の ActionScript2 Bytecode の先頭に代入イメージを付加する
- (b) 〃 Bytecode 中の文字列を入れ替える
- (c) 変数に bind した DefineEditText(*2) 中の文字列を書き換える
等、色々な方法があります。
このうち (a) と (b) の方法について必要な知識からその実装まで一通り解説します。
DoAction タグとは
DoAction は SWF 3 から導入されたタグで ActionScript2 の Bytecode(*3)を収納します。
以下のフォーマットです。
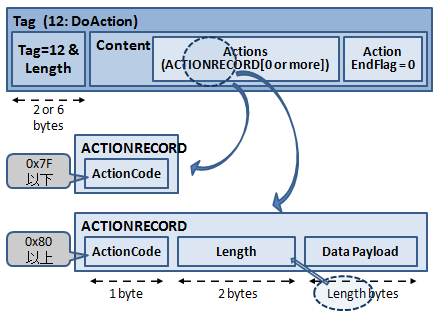
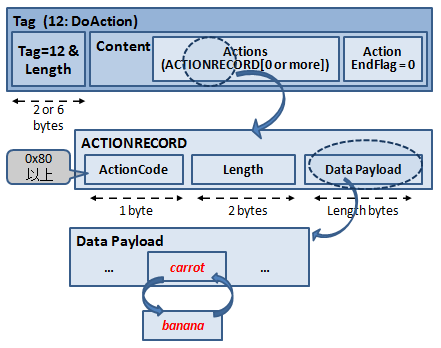
- Actions(ACTIONRECORD [0 or more]) フィールドに ActionScript2 の Bytecode が入ります。
- Bytecode の分解は簡単で、0x7F 以下だと ActionCode 単体で、0x80 以上の時は値が後ろに続きます。
- 0x80 以上の時のバイナリ形式は TLC(Type,Length,Content)になっていて、バイナリ編集者に優しい(*4)形式です。
Bytecode 解析
-
Data Payload の中身を気にしなければ、Bytecode を分解するのに以下の処理で十分です。
- IO_Bit はこちらを参照 > http://openpear.org/package/IO_Bit
|
1 2 3 4 5 6 7 8 9 10 11 12 |
$reader = new IO_Bit(); $reader->input($bytecode); $actions = array(); while ($code = $reader->getUI8()) { $action = array('Code' => $code); if ($code >= 0x80) { $length = $reader->getUI16LE(); $action['Length'] = $length; $action['Data'] = $reader->getData($length); // Data Payload } $actions[] = $action; } |
もう少し頑張って ActionCode (の名前)や Data Payload の中身を解釈してみます。
- まず、ActionCode 一覧をテーブルで定義。
|
1 2 3 4 5 6 |
class IO_SWF_Type_Action extends IO_SWF_Type { static $action_code_table = array( // ActionCode only 0x04 => 'NextFrame', 0x05 => 'PreviousFrame', 0x06 => 'Play', |
- ActionCode に応じて Data Payload の中身を解釈。
|
1 2 3 4 5 6 7 8 9 10 11 |
static function parse(&$reader, $opts = array()) { $action = array(); $code = $reader->getUI8(); $action['Code'] = $code; if ($code >= 0x80) { $length = $reader->getUI16LE(); $action['Length'] = $length; switch ($code) { case 0x81: // ActionGotoFrame $action['Frame'] = $reader->getUI16LE(); break; |
- ActionCode に応じて、後ろに続く Payload Data の形式が決まります。
- SWF の文字列(STRING)は、\0 終端のフォーマットです。長さフィールドを持たないので処理が少し面倒です。又、PHP の String 型は途中に \0 を含められるので、PHP の API を用意する場合は、途中の \0 を除去する必要があります。
(a) Bytecode の頭に代入イメージを付加する
変数代入に相当する Bytecode を先頭に付加すれば変数パラメータを初期化出来ます。この方法だと SWF 中の Bytecode を弄らずに済むので実現するのが楽です。
どんな Bytecode を付加するか
試しに変数代入のスクリプトを 入れて Adobe Flash でパブリッシュしてみます。
|
1 2 3 |
a = "1"; b = "2"; c = "3"; |
以下のような Bytecode ができます。 (IO_SWF 付属の swfdump.php の表示です)
- IO_SWF についてはこちらを参照 > http://openpear.org/package/IO_SWF
|
1 2 3 4 5 6 7 8 9 10 11 12 13 14 15 16 17 18 19 20 21 22 23 24 25 |
% php /usr/share/php/sample/swfdump.php \ -f actionpush.swf -h <略> Code: 12(DoAction) Length: 40 Actions: Push(Code=0x96) (Length=3): (String)a Push(Code=0x96) (Length=3): (String)1 SetVariable(Code=0x1D) Push(Code=0x96) (Length=3): (String)b Push(Code=0x96) (Length=3): (String)2 SetVariable(Code=0x1D) Push(Code=0x96) (Length=3): (String)c Push(Code=0x96) (Length=3): (String)3 SetVariable(Code=0x1D) 0 1 2 3 4 5 6 7 8 9 a b c d e f 0123456789abcdef 0x00000010 3f 03 28 00 00 00 96 ? ( 0x00000020 03 00 00 61 00 96 03 00 00 31 00 1d 96 03 00 00 a 1 0x00000030 62 00 96 03 00 00 32 00 1d 96 03 00 00 63 00 96 b 2 c 0x00000040 03 00 00 33 00 1d 00 |
先頭の方を手作業で解釈していくと、以下のように分解できます。
|
1 2 3 4 5 6 7 8 9 10 11 12 |
0 1 2 3 4 5 6 7 8 9 a b c d e f 0123456789abcdef 0x00000010 3f 03 28 00 00 00 96 ? ( <RH> <- length-> Pu 0x00000020 03 00 00 61 00 96 03 00 00 31 00 1d 96 03 00 00 a 1 <len> <T> a \0 Pu <len> <T> 1 \0 SV Pu .... - <RH>: RecordHeader tagのヘッダ - <length>: Tag Content Length (= Bytecode 全体の長さ) - Pu: Push 命令 - <len>: Data Payload length - <T>: Type 0 はString を表す - SV: SetVariable 命令 |
実装サンプル
これらの実験から、以下の Bytecode を先頭に付加する事で、任意の変数に任意の文字列を代入出来る事が分かります。
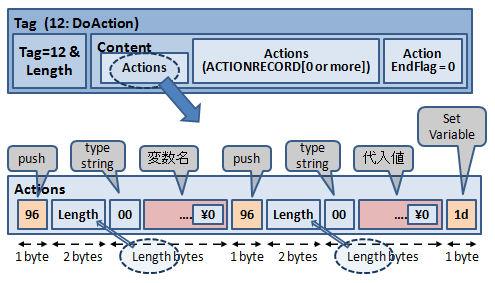
- 渡したい変数と代入値の文字列を、えんじ色の「....」のフィールドに当て嵌めます。
Bytecode 生成は以下のように実装できます。
|
1 2 3 4 5 6 7 8 9 10 11 12 13 14 15 |
$bytecode = ''; foreach ($trans_table as $key_str => $value_str) { $key_strs = exlode("\0", $key_str); // \0 除去 $value_strs = exlode("\0", $value_str); // \0 除去 $key_data = chr(0).$key_strs[0]."\0"; $value_data = chr(0).$value_strs[0]."\0"; // Push (key) $bytecode .= chr(0x96).pack('v', strlen($key_data)).$key_data; // Push (value) $bytecode .= chr(0x96).pack('v', strlen($value_data)).$value_data; // SetVarables $bytecode .= chr(0x1d); // End $bytecode .= chr(0); } |
(b) Bytecode 中の文字列を入れ替える
(a) 方式のように先頭に代入イメージを挿入する方式では、未初期化の変数を決める必要があります。しかし、ひな型 SWF 自体に決め打ちで値が入っていれば、その SWF 単体で動作テストが出来るので、決め打ちの値を必要に応じて書き換える方が開発が楽になります。
そこで、Byecode 中の文字列を入れ替える方法について紹介します。
編集したい文字列が入る可能性のある ActionCode としては、GetURL, ConstantPool, そして (a) でも扱った Push 命令が考えられます。
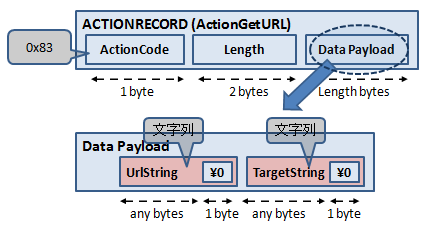
GetURL (0x83)
- 後ろに文字列が2つ並ぶだけなので簡単に入れ替えられます。
ConstantPool (0x88)
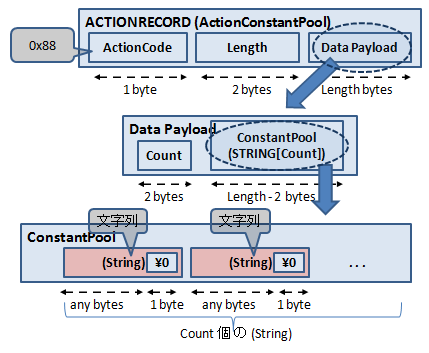
お次は ConstantPool。SWF5 以降のActionCode なので、Flash Lite 1.1 では見かけません。
- Count フィールドの数だけ並びますが、単純に \0 終端の文字列が並ぶだけです。これの処理も簡単です。
Push (0x96)
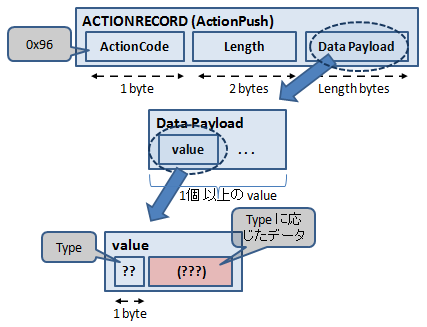
最後に Push。この命令は複数の値を一度に(スタックに) Push 出来るので少し面倒です。
しかし、変数代入は Push 命令を使う為、これの処理は避けられません。
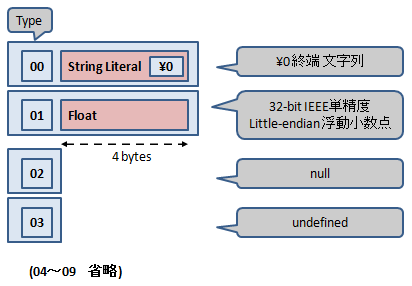
- この value は文字列以外に数値や(ConstantPool への)参照値を扱えます。
- 各々の値に Type フィールドがある為、Push する複数の値に文字列や数値等、複数の Type が混在する事に注意して下さい。
実装サンプル
- 実装コード全体はこちらです。 → http://openpear.org/package/IO_SWF/src/trunk/IO/SWF/Type/Action.php
- 長くなるのでコードの先頭の方だけ引用します。
- parse (バイナリの分解)
|
1 2 3 4 5 6 7 8 9 10 11 12 13 14 15 16 17 18 19 20 21 22 23 24 25 26 27 28 29 30 31 32 33 34 35 36 37 38 39 40 41 |
static function parse(&$reader, $opts = array()) { $action = array(); $code = $reader->getUI8(); $action['Code'] = $code; if ($code >= 0x80) { $length = $reader->getUI16LE(); $action['Length'] = $length; switch ($code) { <略> case 0x83: // ActionGetURL $data = $reader->getData($length); $strs = explode("\0", $data, 2+1); $action['UrlString'] = $strs[0]; $action['TargetString'] = $strs[1]; break; <略> case 0x88: // ActionConstantPool $count = $reader->getUI16LE(); $action['Count'] = $count; $data = $reader->getData($length - 2); $strs = explode("\0", $data, $count+1); $action['ConstantPool'] = array_splice($strs, 0, $count); break; <略> case 0x96: // ActionPush $data = $reader->getData($length); $values = array(); $values_reader = new IO_Bit(); $values_reader->input($data); while ($values_reader->hasNextData()) { $value = array(); $type = $values_reader->getUI8(); $value['Type'] = $type; switch ($type) { case 0: // STRING $value['String'] = IO_SWF_Type_String::parse($values_reader); break; case 1: // Float $value['Float'] = IO_SWF_Type_Float::parse($values_reader); break; <略> |
- build (バイナリの構築)
|
1 2 3 4 5 6 7 8 9 10 11 12 13 14 15 16 17 18 19 20 21 22 23 24 25 26 27 28 29 30 31 32 33 34 35 36 37 38 39 40 41 |
static function build(&$writer, $action, $opts = array()) { $code = $action['Code']; $writer->putUI8($code); if (0x80 <= $code) { <略> switch ($code) { <略> case 0x83: // ActionGetURL $data = $action['UrlString']."\0".$action['TargetString']."\0"; $writer->putUI16LE(strlen($data)); $writer->putData($data); break; <略> case 0x88: // ActionConstantPool $count = count($action['ConstantPool']); $data = implode("\0", $action['ConstantPool'])."\0"; $writer->putUI16LE(strlen($data) + 2); $writer->putUI16LE($count); $writer->putData($data); break; <略> case 0x96: // ActionPush $values_writer = new IO_Bit(); foreach ($action['Values'] as $value) { $type = $value['Type']; $values_writer->putUI8($type); switch ($type) { case 0: // STRING $str = $value['String']; $pos = strpos($str, "\0"); if ($pos === false) { $str .= "\0"; } else { $length = $pos + 1; $str = substr($str, 0, $pos); } $values_writer->putData($str); break; case 1: // Float IO_SWF_Type_Float::build($values_writer, $value['Float']); break; <略> |
parse した後、変数の中身を書き換え、build して SWF バイナリに戻せば、編集が出来る事になります。
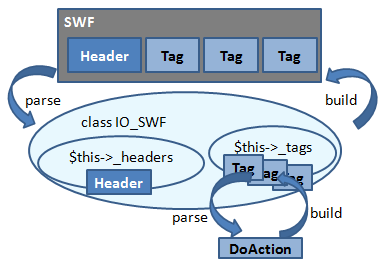
IO_SWF での実装
-
上記の (a) と (b) の処理を openpear の IO_SWF 上に実装しました。
- install 方法
|
1 2 3 |
pear channel-discover openpear.org pear install openpear/IO_Bit pear install openpear/IO_SWF |
- 既に install されていてバージョンが古い場合
|
1 2 |
pear upgrade openpear/IO_Bit pear upgrade openpear/IO_SWF |
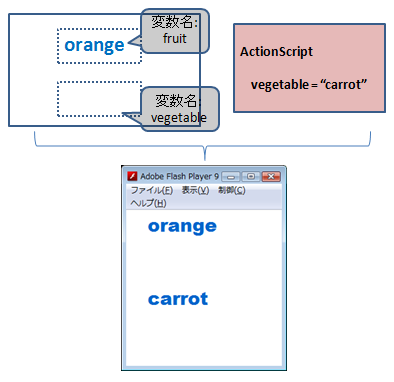
- 素材SWFを以下のように作成します。
(a) Bytecode の頭に代入イメージを付加する
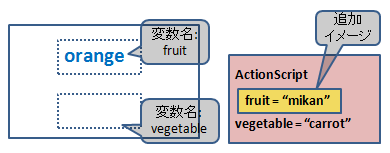
(a) の方式では、orange の文字列を書き換える事が出来ます。carrot の方は ActionScript の代入命令が既にある為、先頭に代入命令のイメージを差し込んでも、その後上書きされてしまうのでダメです。
- 実装コードは http://openpear.org/package/IO_SWF/src/trunk/IO/SWF/Editor.php の setActionVariables にあります。
|
1 2 |
% php /usr/share/php/sample/swfsetactionvariables.php ¥ actiontext.swf fruit mikan > actiontext-mikan.swf |
- 変換後 SWF (actiontext-mikan.swf)
(b) Bytecode 中の文字列を入れ替える
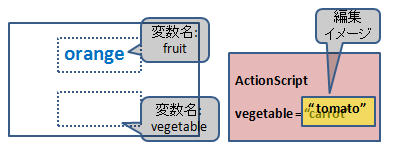
(b) の方法では carrot の文字列を書き換える事が出来ます。orange の文字列は (DoAction でなく) DefineEditText のタグの中に文字列が含まれる為、この方法では変更できません。
- 実装コードは http://openpear.org/package/IO_SWF/src/trunk/IO/SWF/Tag/Action.php の replaceActionStrings にあります。
|
1 2 |
% php /usr/share/php/sample/swfreplaceactionstrings.php actiontext.swf ¥ carrot tomato > actiontext-tomato.swf |
- 変換後 SWF (actiontext-tomato.swf)
簡単ですね!
まとめ
- ActionCode の分解は簡単。0x80 以上の時に (Length フィールド付きで) Data Payload が続く。
- Data Payload の中身は ActionCode 毎に違うので少し手間。
- Push 命令は複数の値を一度に Push 出来る上に色んな型が混在するので面倒。
- 文字列は null(\0) 終端 (それ用の Lengthフィールドを持たない)
- PHP の文字列型は \0 を途中に挟めるので注意。(null 終端では無い)
- 文字列を編集して長さが変わると Action Payload Data Length, Tag Length, SWF Header Length の3つの Length を更新する必要がある。
- つまり、文字列の長さを変えずに replace するならば、間に \0 を含まなければ、他に書き換える必要なし。
参考 URL
- SWF 仕様
- Flash Lite 公式ドキュメント
- SWF ファイルへのバイトコード挿入
- SWF/format/Action
最後に
次回は、DefineShape の続きか、DefineEditText か DefineSprite のいずれかを取り上げる予定です。
それでは。
*1: Flash Lite 1.x は ActionScript1 ですが Bytecode 形式は互換ですので、ActionScript2 として話します。
*2: 要望があれば DefineEditText の編集も記事にしようと思います
*3: コンパイルされた結果のバイナリ、VirtualMachine (もしくは CPU)が解釈できる命令列が並ぶ
*4: Type 毎の Content 詳細を知らずに chunk 分解出来るので

